07 February 2012

classic french


Chocolate Souffle. Yep. I don't even need to say anything else about it because it's just that good (or perhaps I'm tired and just don't want to take time to be descriptive and witty. . .you're choice).

Chocolate Souffle
1 Tbsp. white sugar
1/2 cup cocoa powder
1/4 cup unbleached all-purpose flour
sprinkle cinnamon
1/4 cup butter, softened
1 cup milk (I used almond milk)
1/2 cup dark brown sugar
1 tsp. vanilla
4 eggs, separated
2 Tbsp white sugar

Preheat oven to 350*F. Butter a 6 cup souffle dish. Or if you don't have a 6 cup souffle dish a springform pan works as well. Coat with 1 Tbsp. white sugar.

In a bowl stir together cocoa powder, cinnamon and flour. Add butter and blend well.

Heat milk in a medium saucepan until very hot. Reduce heat; add cocoa mixture, beating with a whisk until smooth and thick. Remove from heat and stir in dark brown sugar and vanilla. Cool slightly and add egg yolks one at a time beating well after each addition. Allow to cool to room temperature.

Beat the egg white until foamy and then gradually add the 2 Tbsp. white sugar and beat until stiff peaks form. Stir a small amount of egg whites into the chocolate mixture, then fold the chocolate mixture into the remaining egg whites. Pour into the prepared baking dish and bake for 30-45 minutes or until the top is puffed.

This is best served immediately. The picture shows it served with a creme anglaise sauce which I will post the recipe for some other time. You do not have to serve it with this sauce. It could also be served with ice cream or whipped cream.
06 February 2012

for bread lovers

Remember that new adventure I told you about a couple of posts back? Well here is the fruits of that adventure or rather the bread of that adventure.

Sourdough bread is not like yeast leavened bread which you can make all in one day. With sourdough you have to be planning ahead in order to make it because you have to make the starter if you don't have any sourdough starter. Then you have to make the sponge and then the final step is the actual bread. So like I said you have to be planning ahead in order to make this.

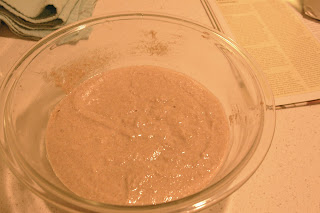
To make the starter you combine 2 cups of flour and 2 cups of water in a glass or ceramic bowl and stir it up. Then allow it to sit uncovered in a warm place for 2 to 5 days, stirring it occasionally. When the starter is ready it will have a clean, yeasty smell, small bubbles and will have a slightly thicker texture than it had to begin with.

The night before you want to make the bread you need to make the sponge. To make the sponge add 2 cups flour and 2 cups warm water to the starter then cover it and allow it to sit in a warm place overnight. The next step is very important! Before you start making the bread in the morning make sure you take out 1 cup of starter so that you have it to use the next time. If you forget (like I have) you have to start all over making the starter again (which I need to do. . .oops!).

This is the starter.

Now you are ready to make the bread. To the sponge add 6 cups flour (depending on what type of bread you want you can use different flour. I used a combination of unbleached all purpose flour and whole wheat.), 2 cups warm water, 2 tsp. salt, and 2 Tbsp. honey. Combine into a smooth dough and turn out onto a floured surface. Knead the dough with floured hands for 10 minutes, adding flour as necessary to prevent sticking.


Place the kneaded dough in a greased bowl and brush the top with oil. Cover and allow to rise in a warm place for about 3 hours or until doubled in size.

Reknead briefly and then split the dough in half and place in greased loaf pans. Brush the tops with a little more oil and allow to rise for 2ish hours. Slice the tops of the loaves and bake for about 40 minutes to an hour (depending on how hot your oven runs) in a 350* oven. Allow to cool for about 10 minutes and remove from the loaf pans. Enjoy warm with butter and strawberry jam or however else you enjoy your bread.

04 February 2012

Tiramisu

I greatly enjoy Tiramisu. It's one of those classic Italian desserts that just send you to another planet while you are savoring every last bite, and then you lick the plate. It is the perfect combination of slightly sweet, coffee, and creaminess. I first made Tiramisu probably three or four years ago, and it has been on my favorites list ever since. Here is my version.

Tiramisu
Espresso Syrup:
1/3 cup water
1/2 cup sugar
2/3 cup strong brewed espresso (or french pressed coffee)
1/4 cup coffee liqueur (or you can use brandy if preferred)
Cream Filling:
1 1/2 cups heavy whipping cream
1/3 cup sugar
2 tsp. vanilla
1 lb. mascarpone cheese, softened (I use the coffee one)
1/2 lb. ladyfingers
Cocoa Powder (for dusting)

Start by making an espresso syrup by combining the water and sugar in a saucepan. Bring to a simmer and stir to dissolve sugar. Remove from the heat and cool. Add in coffee and coffee liqueur and set aside until ready for layering.

Then make the filling by whipping the cream with the sugar and vanilla until soft peaks form. Then fold the cream into the softened mascarpone. You can also add some cinnamon into this mixture.

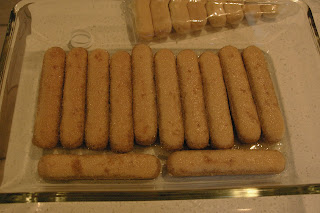
Now you are ready to assemble the Tiramisu. Start by putting a layer of ladyfingers in the bottom of a pan. Pour half of the espresso syrup over the ladyfingers. They will soak up the liquid, so don't freak out!


Then put half of the cream filling on top of the ladyfingers.


Add another layer of ladyfingers.


Pour the other half of the espresso syrup on them.


Then top with the remaining half of the cream filling.


You will want to cover this and let it chill in the fridge and set up overnight if possible. It gets better when it has a chance to sit for a while because the ladyfingers become nice and espresso-y. Before you serve this sprinkle the top with cocoa powder.

Then sit back and let your taste buds take you on a wonderful journey of blissful delight as you enjoy each and every bite of this deliciousness.

03 February 2012

Sugar Cookies

I have been living with an extreme dislike of making sugar cookies. Without going into any detail, sugar cookies were the cause of me ultimately quitting my last job. It has been almost a year since I have made sugar cookies because of that. There was honestly a part of me that believed I would never make sugar cookies again in my life because of my bad experience with them. The fact that I made sugar cookies and that I am blogging about them is an expression of my healing process.

These sugar cookies I have nothing but good memories to associate with them. When I was in college my aunt sent me a box of sugar cookies every year on Valentine's Day. Can I just tell you what a blessing that was, for me a single girl to receive a package on Valentine's Day? It was a big deal to me. So Aunt Lynda, if you are reading this, know that your cookies ministered greatly to my heart and still continue to! Thank you!

A while back my mom asked if I had my aunt's recipe for sugar cookies and told me that it was in our family cookbook (yes, we have a family cookbook, be jealous). The other day, I had a hankering to make her sugar cookies, so here they are.

Sugar Cookies
1 cup unsalted butter, softened
1 cup powdered sugar
1 egg
2 cups flour
1 tsp. baking soda
1 tsp. cream of tartar
1 tsp. vanilla
1 tsp. almond extract
1/4 tsp. salt

Preheat oven to 350*F. Cream together butter and powdered sugar.


Add egg and flavorings (I only used vanilla because I didn't have any almond on hand).


Add in flour, baking soda, cream of tartar, and salt and mix well.


At this point you can chill the dough if you desire to roll it out and cut out cookies, or if you still haven't quite recovered your love of making sugar cookies to that point, you can just drop spoonfuls of cookie dough onto cookie sheets and bake for 8-10 minutes. I baked mine for 4 minutes and then rotated my cookie sheets and baked another 3-4 minutes.


As I bit into one of these little babies, I was already thinking of variations I could make on these, so expect some more sugar cookie goodness to be headed your way soon!

02 February 2012

Getting Creative

You know I believe in celebrating people's birthdays. Well, I try to make them what they like best, so I ask for guidelines. This leads to all kinds of responses, and can lead me on new adventures in cooking. There is always a little part of me that gets nervous when I decide to get creative in the kitchen because I'm a little afraid of failing. But that's one of the things I love most about being in the kitchen. No matter what kind of day I have had, I know that when I step into my kitchen and put together the right ingredients, I will get a delicious result.

All of that to say I asked a co-worker what he wanted for his birthday treat, and he told me cheesecake with jello. I had never heard of such a thing before, so I came home and googled jello cheesecake, and after browsing through what seemed a hundred recipes, I decided to combine several of them to get what I made.

It starts with a chocolate cookie crust, topped with a chocolate cheesecake layer, topped with fresh raspberries over which there is raspberry jello. So let's just call it:

Chocolate Raspberry Jello Cheesecake

Start by melting 4 oz. dark chocolate (at least 60% dark, I would probably go all the way to 70 or 75% if possible, but I like my chocolate dark). Remember when melting chocolate to stir it frequently so it doesn't burn the chocolate.


Then crush up some chocolate sandwich cookies (I used Oreos). Combine with a little melted butter and press into a pie plate.


Bake in a 350*F oven for 7ish minutes to help it to set. If possible I would then put this in the freezer to help it set further. I did not actually get to do that with this one, but I would do it next time.


In a bowl combine about 3/4 cup brown sugar, 1 tsp vanilla, some cinnamon, and about 2 Tbsp. milk (I used heavy whipping cream instead of milk and it made the cheesecake layer much thicker than I had expected), and 8 oz. cream cheese that has been softened. Beat until well combined.


Add in the chocolate and beat again until well combined.


Layer this on top of the cookie crust. At this point I would put this back into the freezer to set for a while, but I didn't do that the first time around. Top with fresh raspberries, and pour over that raspberry jello (a 3 oz. package made according to the directions). Allow to sit in the fridge overnight to set.


The only problem I really encountered that I wasn't expecting was that when I poured the jello over the top the crust kind of fell apart that's why I would suggest chilling it in the freezer after putting in the cheesecake layer, but it ended up just fine. Serve this topped with whipped cream.

01 February 2012

Salted Brownies (sans eggs)

I love sea salt in chocolate. It's just something about that salty-sweet flavor that appeals to my taste buds. I was looking for a brownie recipe without eggs one day, and I stumbled across this recipe for salted fudge brownies. It called for eggs, but it sounded so good I couldn't pass it up and decided just to substitute for the eggs. Here is my adapted version.

Salted Fudge Brownies
1 1/2 sticks unsalted butter
2 oz. unsweetened chocolate
1/4 cup + 2 Tbsp. cocoa powder
1 1/2 cups brown sugar
1 1/2 tsp. vanilla
9 Tbsp. unsweetened applesauce
1 cup unbleached all-purpose flour
1/2 tsp. large flake sea salt + more for sprinkling

Preheat oven to 350*F. Melt chocolate and butter in a saucepan over medium low heat, stirring often.


Remove from heat and add in cocoa powder and stir until smooth.


Add in brown sugar and stir until dissolved. You could also throw in a shake of cinnamon here.


Add in applesauce and vanilla and stir until combined.


Add in flour.


Pour batter into a greased 8x8 or 9x9 pan. I didn't have either of those, so I used what I did have. Then sprinkle with the sea salt and swirl in with a knife. Be careful to not get it too salty.


Bake for 30ish minutes or until the edges are set and the center is still a little soft. Don't over bake!


Enjoy! And they do crumble when you eat them right away when they are warm, in case you were wondering. They are best that way. ;)